Difference between revisions of "Lesson 7"
m (navigation footer) |
m (2 revisions) |
(No difference)
| |
Latest revision as of 04:41, 1 January 2009
Modifying a Program
We're going to add another class. This one, however, will be a subclass of Rect because our goal is to produce an object that draws a rounded rectangle. A rounded rectangle requires the same parameters as a rectangle with the addition of one more: the size of the ovals whose curvature rounds the corners of our rectangle. The oval's dimensions are determined by the number of pixels high and wide:
The Carbon framework call, FrameRoundRect (also part of QuickDraw), expects these dimensions as two integers (2-byte values). Note that, while we pass the address of the Rect data (as for FrameRect), we pass the actual values for width and height (please see [../Reference/Chapter7.html Chapter 7] of the Reference for more discussion of supplying parameters to Carbon framework routines). We can conveniently store the oval's dimensions in a class Point instance variable, or ivar.
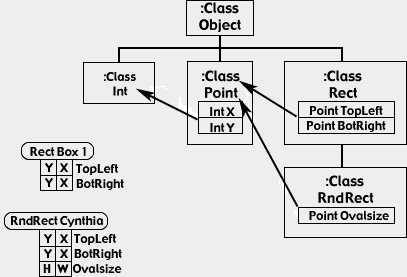
Since a rounded rectangle has so much in common with an ordinary rectangle (i.e., objects created by class Rect), the logical approach would be a subclass of class Rect called, say, class "RndRect". It needs only the one additional ivar which we will name "Ovalsize". By virtue of its inheritance from class Rect then, an object of class RndRect will have a total of three ivars: TopLeft, BotRight, and Ovalsize. TopLeft and BotRight refer to the corners the RndRect would have if it wasn't rounded” that is, the intersection points of the lines on which the sides lie. These points, of course, will lie outside the rounded corners that will be actually drawn on the display.
Next, the class needs a method to store the oval values its object instances receive. The Ovalsize value for this class is stored by means of a PUT: method (look familiar?), which in addition to initializing our oval values, will initialize the rectangle coordinate points TopLeft and BotRight that our class inherited from Rect.
Finally, the subclass RndRect needs a DRAW: method to act on the values stored in an object created from its own class. In this particular DRAW: method, ^BASE retrieves the "base" address of the current object, i.e. the address of the beginning of the object in memory. In this case, it is the address of the rectangle coordinates (which if you recall from a previous lesson, are stored as a record in Rect). The Carbon framework uses this address to locate the values it uses as parameters. Next, the Ovalsize values are put on the stack in a form the Carbon framework expects (using the GET: method of class Point), and then the proper Carbon framework routine (FrameRoundRect) is called to do the actual drawing on the screen.
The subclass definition looks like this:
 :class  RNDRECT  super{ rect }
        point     Ovalsize

 :m PUT:                put: Ovalsize  put: super  ;m  ( l t r b w h -- )

 :m DRAW:       ^base  get: Ovalsize  FrameRoundRect  ;m

 :m DISP:       put: self  draw: self  ;m

 ;class
That DISP: method definition we use in our class is not redundant with the definition used in the superclass. SELF always returns the address of the current object. When SELF was used in our class' superclass, it returned the address for Rect. In our class, it returns the address of RndRect.
Warning: If we did not redefine
DISP:as we did, invoking aDISP:message on any instance ofRndRectwould have usedRect's definition forDISP:, which in turn would have calledRect'sPUT:andDRAW:methods (and not the new methods we defined in the subclassRndRect).
Once the class is defined, it is now ready for the creation of an object:
RndRect Cynthia
To draw this object in window ww, as we did in the previous lesson, you can do this:
Window ww
test: ww
set: ww
20 20 100 60 20 30 disp: Cynthia
The values 20 and 30 are the width and height of the oval in the rounded corners. The DISP: method uses the PUT: methods defined in our class and its superclass to take all six values off of the stack and store them in the ivars defined in our class and the ones inherited from its superclass. Here is a diagram of how the addition of this subclass works within the structure of the overall program:
Next, you'll be introduced to the powerful building blocks of Mops: the predefined classes.
| Lesson 6 | Tutorial | Lesson 8 |
| Documentation | ||

